Software testing can be revolutionized by using Artificial Intelligence (AI), which can significantly increase efficacy and efficiency. Our use case focuses on software application test case generation. The manual and labor-intensive procedure can be greatly reduced by using a Text Generation Model to automatically create test scenarios based on requirements or user stories. This article creates a Text Generation Model using OpenAI's text generation model, namely GPT-3.5-turbo.
Steps to
Build the Model and Web App:
Pre-requisite:
Ø
Go through this: https://platform.openai.com/docs/quickstart?context=python
Ø
Install Python and other dependencies like streamlit,
openAI, etc. on your machine using the PIP package installer if you are planning to
run it on your local.
Ø
Create an Open API account, and generate API key using https://platform.openai.com/api-keys
(Note* You receive free $5 when signing up using your mobile phone, which is
sufficient for you to play with.)
Step 1:
Create a GitHub Account and Create a New Repository
1.
Go to GitHub’s website.
2.
Click on
the “Sign up” button in the top-right corner. Provide valid details to sign-up.
3.
Once
logged in, click on the “+” icon in the top-right corner and select “New
repository.”
4.
Give your
repository a name, such as “test-case-generator”
5.
Choose if
you want your repository to be public or private.
6.
Initialize
the repository with a README file.
7.
Click
“Create repository.”
Step 2:
Add Files to Your Repository
1.
In your
repository, click on “Add file” and select “Create new file.”
2.
Create a
file named app.py—this will be your main Python file for
the Streamlit app.
3.
Write your
Streamlit code into app.py.
4.
Create
another file named requirements.txt. This file should list all Python
libraries that your app depends on, including streamlit and openai.
5.
Commit the
new files by clicking “Commit new file.”
Here is app.py:
import streamlit as st
import openai
import os
# Retrieve
the API key from the environment variable
OPENAI_API_KEY
= os.getenv('OPENAI_API_KEY')
#
Initialize the OpenAI client with the API key
openai.api_key
= OPENAI_API_KEY
# Define
the function to generate test cases
def
generate_test_cases(requirement):
response = openai.chat.completions.create(
model="gpt-3.5-turbo",
messages=[
{"role": "system", "content": "You are a helpful
assistant capable of generating software test cases."},
{"role": "user", "content": requirement}
]
)
return response.choices[0].message.content
# Streamlit
app layout
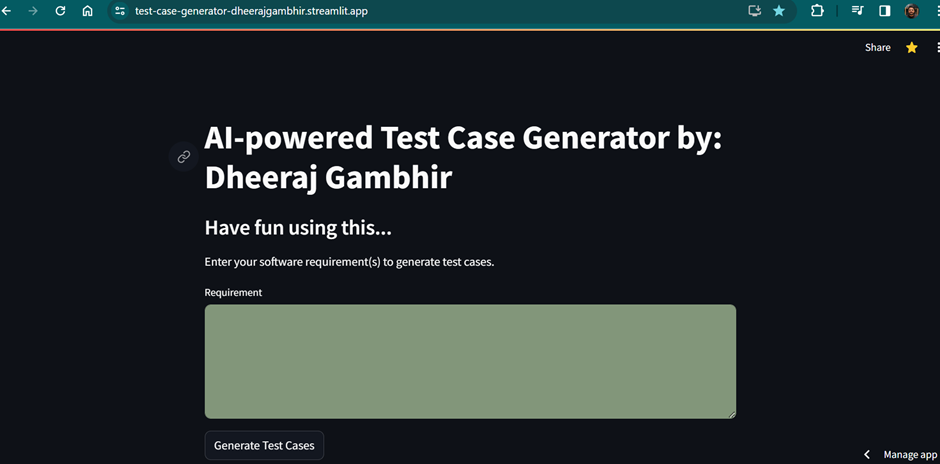
st.title('AI-powered Test Case Generator
by: Dheeraj Gambhir')
st.subheader("Have fun using
this...")
st.write('Enter your software
requirement(s) to generate test cases.')
# Text area
for user to enter the software requirement
requirement
= st.text_area("Requirement", height=150)
# Button to
generate test cases
if st.button('Generate Test Cases'):
if requirement:
with st.spinner('Generating...'):
try:
test_cases =
generate_test_cases(requirement)
st.success('Generated Test Cases')
st.write(test_cases)
except Exception as e:
st.error('An error occurred while
generating test cases.')
st.error(e)
else:
st.error('Please enter a requirement to generate test cases.')
st.write('Note* Kindly review these test
cases and add/update based on your project specific requirements.')
Here is requirements.txt:
streamlit
openai
Step 3:
Add Your API Key as a Secret
1.
Go to your
GitHub repository’s Settings tab.
2.
Find the
“Secrets” section in the left sidebar and click on “Actions.”
3.
Click on
“New repository secret.”
4.
Name your
secret (e.g., OPENAI_API_KEY) and paste your OpenAI API key as the
value. Note* This is the key that you created from https://platform.openai.com/api-keys.
5.
Click “Add
secret” to save it.
Step 4:
Create a Share.streamlit.com Account
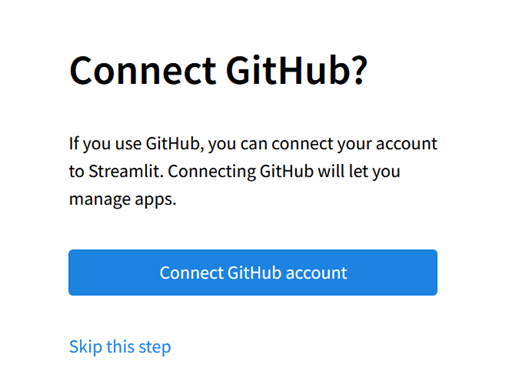
Visit https://share.streamlit.io/
and click on “Connect GitHub account” to sign up and link your Streamlit
account with GitHub.
Step 5:
Deploy Your Streamlit App
1.
Once
logged into Streamlit, click on “New app.”
2.
Select the
GitHub repository you created earlier.
3.
Choose the
branch where your files are located.
4.
Write app.py in the "Main file path"
field.
5.
In the
“Advanced settings,” input your secret key (OPENAI_API_KEY) into the "Environment
variables" section. P.S.: Ensure that you add the correct API Key. OpenAI API
key usually starts with "sk-".

6.
Click
“Deploy” to deploy your app. Streamlit will automatically install the
dependencies listed in your requirements.txt file and deploy your app.
You are all set:
Comments
Post a Comment