- Introduction
- Prerequisites
- Preparing the YAML
- Setting up the pipeline
- Conclusion
- Introduction:
In this article, we will be seeing how we can build a CI/CD pipeline in Azure DevOps to execute selenium test cases with C# language binding and execute tests in Browser Stack. But before we go there let us check what is CI/CD.
- Continuous integration (CI) is a process in which several team members merge their code repeatedly into a shared trunk. Before every integration, the changes are validated through automated testing. In this manner, we can find issues as quickly as possible and prevent defects from entering our live environments.
- Continuous delivery (CD) is the extension of continuous integration that automates deployments by making sure changes that have successfully passed the automated designated tests are made to the next environment automatically as soon as they are ready.
- Continuous Integration/Continuous Delivery is a set of best practices and principles that engineering teams leverage to apply and deliver source code changes effectively and dependably.
What is Azure DevOps?
It is an incredible DevOps suite that allows organizations to build and release applications at a faster pace than they can with any conventional software development methodologies.
To build and execute automation tests in Azure DevOps we are using the ‘Pipelines’ and ‘Releases’ modules of Azure DevOps. For this project, we first created a build pipeline using YAML where in the end we added a task to publish the artifact to use it in the next step (Release Pipeline).
2. Prerequisites:
- C# (Programming Skills): As we are going to focus on building a pipeline and not actual C# coding, we just need a basic knowledge of C#.
- CI/CD: A basic idea of what CI/CD is more than enough to follow in this article.
- Testing experience: To correlate quickly with this article, it will be good if readers have a basic idea of test automation.
- Azure account: Will need a basic Azure account, users can create a free account here: https://azure.microsoft.com/en-in/free
- BrowserStack account: If you don’t have a paid BrowserStack account, you can use a free trial for now: https://www.browserstack.com/users/sign_up
Just to keep everyone apprised, we have used Selenium WebDriver + C# .NET + Specflow to create our automated tests for web UI, which is a nice blend.
In case you are wondering why we are using BrowserStack, it offers several benefits, including:
1. Increased test coverage and confidence in your releases: BrowserStack allows you to test your application on a variety of real browsers and devices, which can help you improve the test coverage of your automation tests. This is crucial because it enables you to find and fix bugs that may not be visible on a single browser or device. Additionally, it guarantees that your application functions properly across several devices and browsers, allowing you to enhance the client experience.
2. Faster test execution: The cloud-based infrastructure of BrowserStack enables you to run your automation tests simultaneously across a range of browsers and devices. By doing this, you can shorten the time it takes to run the test and receive the results.
3. Reduced Infra costs: Because BrowserStack supports testing across several browsers and devices, there is no longer a need to maintain a complex internal infrastructure. Hardware, maintenance, and setup costs may be reduced as a result. The pay-as-you-go pricing structure of BrowserStack can assist you in lowering the price of test automation.
4. Comprehensive Test Reports: BrowserStack provides comprehensive test reports with videos, screenshots, logs, and other debugging information. This helps in troubleshooting and addressing issues effectively.
5. Reliable: BrowserStack has a proven track record of reliability. This is crucial because you need to have faith that the infrastructure used by BrowserStack will support your automated testing.
Overall, you can accomplish more thorough testing, quicker feedback, and increased cooperation by adding BrowserStack into your test automation pipeline, ultimately resulting in higher product quality and a better user experience.
Give it a shot if you have not tried it already: https://www.browserstack.com/users/sign_up
Note* I have added a sample code here and if anyone is interested in cloning and using it for a demo purpose, feel free to do that: https://github.com/dgambhir01/SampleAzurePipelineCSharp
Do read README.md file for more information.
3. Preparing the YAML:
What is YAML?
YAML is a human-readable data serialization format file. YAML files are frequently used to contain project configuration settings, build and deployment instructions, or other project-related data in the context of a cloned project. They support uniformity and encourage developer collaboration.
Here is what typically goes into a YAML file:
1. Project Configuration: YAML files are mainly used to store project configuration settings, such as application properties, environment variables, and global settings. This allows you to define project-specific parameters in a structured and readable format.
2. CI/CD Pipelines: YAML is widely used for defining Continuous Integration and Continuous Deployment (CI/CD) pipelines. CI/CD tools like Azure, Jenkins, and GitHub Actions often use YAML files to define build, test, and deployment steps.
Note* You might find YAML files in various locations depending on the purpose they serve but, in this case, it is optimal to keep it in the root Directory to hold global configuration settings. Keep in mind that the specific usage and location of YAML files can vary widely depending on the project’s requirements and the tools being used. Always refer to the project’s documentation or guidelines to understand the purpose and location of YAML files within the cloned repository.
YAML (Sample code):

Note* There are a few important attributes in this YAML that should be checked thoroughly like the trigger (it states when there are any changes in the mentioned branch name and then only executes this pipeline), vmImage (it states in which machine to execute this pipeline), and then the projectName (kindly ensure your project name is typed and spelled correctly).
4. Setting up the pipeline:
We have added this YAML in our automation framework code base so that we can use this to create a build pipeline in Azure DevOps by following these steps:
- Click on ‘Pipelines’ and then click on ‘Create Pipeline’ as shown below:

2. Now select ‘Azure Repos Git (YAML)’. Note* I have my YAML file in the Azure repo itself, so I selected this, if you have your code somewhere else like Bitbucket, Git, etc., please select it accordingly:

3. Select your repo from this dropdown (highlighted below):

4. Now select the ‘Existing Azure Pipelines YAML file’ option as shown below:

5. At this point, it should prompt you to select a path of your YAML file, so select that and click the Continue button.

6. Click on ‘Run’ to ensure it builds the project properly without errors. We are running it manually here but just want to mention that it will run automatically as we have added a trigger in the YAML file to run on any push to the master branch.

As our build is working fine, now let us move to the ‘Releases’ section and create a new release:
- Click on ‘Releases’ and then click on ‘New Pipeline’ as shown below:


This task satisfies the Visual Studio Test task in a build or release pipeline that can run without needing a full Visual Studio installed on the agent machine.
No, need to make any changes to the diverse options provided in this task. Just click ‘Save’.
7. Let us add our 2nd task i.e., ‘Visual Studio Test’:
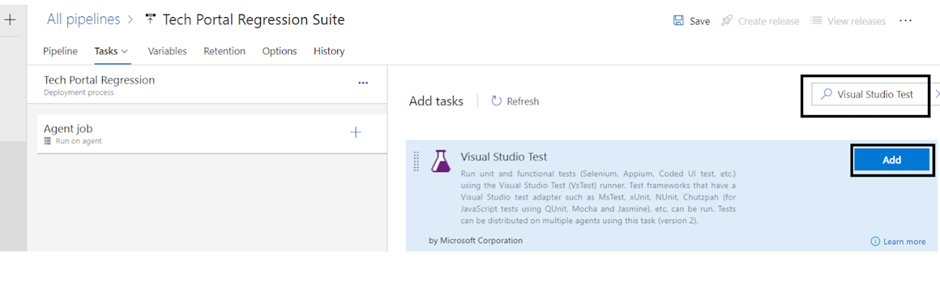
This task is to run unit and functional tests (Selenium, Appium, etc.) using the Visual Studio Test (VSTest) runner.
This task can be executed using three options provided under the ‘Test selection’ drop-down. I have used the ‘Test Plan’ option as I am required to run my test that is automated under a given Test plan and then automatically mark their status based on the test results i.e., Pass, Fail, or Skip.
Read more here: https://learn.microsoft.com/en-us/azure/devops/test/run-automated-tests-from-test-hub?view=azure-devops


This task is to publish test results to Azure Pipelines. No, need to make any changes to the diverse options provided in this task. Just click ‘Save’.

Our ‘Release pipeline’ creation work is done, now let us set up a continuous deployment trigger:
- Click on the ‘Pipeline’ tab and enable the ‘Continuous deployment trigger’ option as shown below:

2. Let us also set the scheduled release trigger:

All set, let us go back to the Releases pipeline section find the pipeline that we just created, and click on the ‘Create Release’ button. We are creating a release pipeline manually here but just want to mention that it will run automatically as we have added both ‘Continuous deployment trigger’ and ‘Scheduled release trigger’ (as shown above):

Then click on the ‘Create’ button:

It should create a release like shown below:


If you are looking for a way to improve the quality of your software, Azure CI/CD pipeline and BrowserStack can be a great option. This combination can help you improve the test coverage, speed, and reliability of your automation tests. This can help you identify and fix bugs earlier, speed up the release process, and improve the user experience for your customers. Hope you get an idea of how we can create a CI/CD pipeline in Azure DevOps to execute selenium test cases with C# language binding and execute tests in Browser Stack.
Comments
Post a Comment